Release Date: Production 10 November 2015
Status: Released to Production
For detailed information on Aztec 3.6.4 - 3.7.2 please view a section below.
For more information any of the features introduced in this release click the title link to navigate to the new feature information.
Electronic Witness - Zonal ID PM723
Electronic witness can only be applied to actions which can have access controlled via button security and not actions that are controlled by FoH permissions in Staff and Security (e.g. payment corrections).
Electronic witness can be used in conjunction with existing button security so that one of the two users must have permission to use the button.
If button security is not in use and electronic witness is enabled, then all users must always have a second clocked in user (regardless of role permission) witness the action.
In Theme Panel design, a padlock is displayed on any buttons that have either button security or witness configured. On the POS, only buttons with button security will be padlocked (if the user does not have permission to use that button).
Head Office Configuration - Configuration
-
OpenAztec Theme Modelling | Themes or Shared Panels
-
Select the required panel (from shared panels) or the required theme, click design
-
Double click the required button electronic witness is to be assigned
-
Select Edit Security,the Edit Button security window is displayed
-
Select the check boxes alongside the roles you want to be able to use the button
-
Select the Witness Required check box, if selected it will prompt an operator pressing the button for a witness
-
Click OK and Save any updates as required
Head Office Configuration - Send Changes to Sites
For the new settings made at Head Office to take effect at site, perform a communications job to the required sites.
For detailed information on running communications jobs click here.
Site Operations - Prompt on the POS
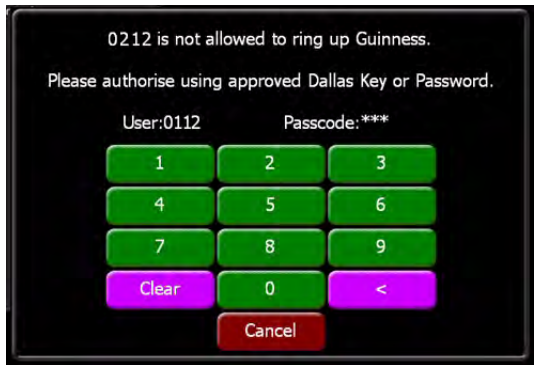
When a button is configured to require electronic witness, after selecting it a keypad entry window is displayed on the POS for a second person to enter their user ID to witness the action. The second user needs to identify themselves on the POS as they normally would when clocking in, for example, dallas key, mag swipe, PIN, two-step authentication.
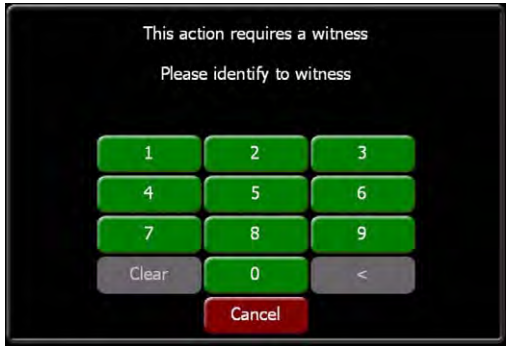
Users cannot witness an action when they are not clocked in or are in training mode. Users also cannot enter their PIN again to witness their own action (i.e. self witness is not allowed). A warning message will be displayed in each of these cases and the system will prompt for another User ID to be entered.
Two Step Authentication - Zonal ID PM735
-
Single step authentication uses one of the existing methods of logging in, i.e. by dallas key, mag swipe or PIN entry
-
Two step authentication involves logging in using a typed four digit FoH name and a typed passcode or one of the existing methods of logging in (dallas key or mag swipe) and a typed passcode
If two step identification is enabled, the FoH PIN field in Staff & Security will be hidden, and the passcode field shown instead.
If a four digit FoH name is configured, this can be used in place of FoH PIN in all the places that PIN is required (e.g. iServe, ZCPS Advanced Roaming).
Head Office can configure the passcode to be reset via the EPoS terminal after a set number of days.
Head Office Configuration - Estate
-
Open Aztec Base Data | Estate Structure | Estate Level | Staff & Security tab
-
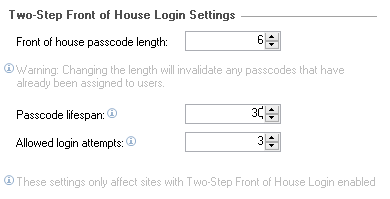
Define the Two Step EPoS Logon Settings as required:
-
EPoS passcode length: Define the number of characters that must be entered when setting a user’s EPoS passcode in Aztec Staff & Security
-
Passcode change after days: Define the number of days after which the user will be prompted to change their passcode. (A setting of zero means they will never be asked)
-
Allowed EPoS logon attempts: Define the number of consecutive failed EPoS logon attempts after which the user will be blocked from using EPoS terminals on site (until unblocked)
-
-
Select Save
Head Office Configuration - Site
-
Open Aztec Base Data | Estate Structure | Estate Level | Site| Staff & Security tab
-
Select the Two Step EPoS logon check box
-
Select Save
Head Office Configuration - Send Changes to Sites
For the new settings made at Head Office to take effect at site, perform a communications job to the required sites.
For detailed information on running communications jobs click here.
Site Configuration - Configuring Users
At site or site master, if the two step authentication is enabled, when adding a new user, the wizard will prompt the user to enter a passcode instead of a PIN:
-
Open Aztec Staff & Security | Users | Add New Users
-
Proceed through the wizard as normal until the Front of House login step is displayed
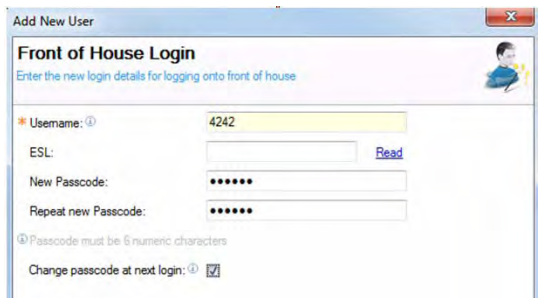
If the two-step authentication is enabled, the Front of House Login Details window will show the Passcode field and if one-step authentication is enabled, the PIN field will be displayed
-
Enter the username
If FoH name is to be used to identify on the terminal, it must be set as 4 digits at this step and must be unique per site
-
Enter the new passcode and repeat to confirm
-
Select the Change passcode at next login check box to force the new user to change their passcode when they login to the POS system
-
Select Finish to complete the wizard and save the new user
If the Username is four digits long it can be used as the first step of the two-step login process on the terminal, provided that the Allow password log on setting is enabled at head office. If a Username longer than four digits or letters is entered, the user will only be able to use a Dallas key or swipe card as the first login step.
If the Change passcode at next login check-box is selected at site/site master, the new user will be forced to change their passcode the first time they log into the EPoS system.
When editing an existing user with two-step authentication, the Change button allows you to enter a new passcode if required: The passcode is always masked.
Front of House Operation
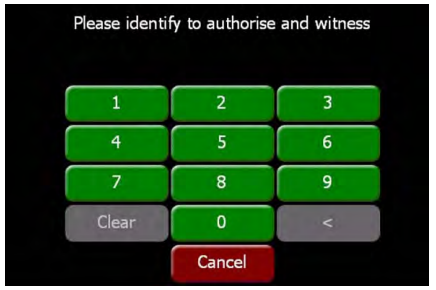
When logging on, the user ID (which is the FoH name defined in Staff & Security) is displayed on the screen, but the passcode is masked out:
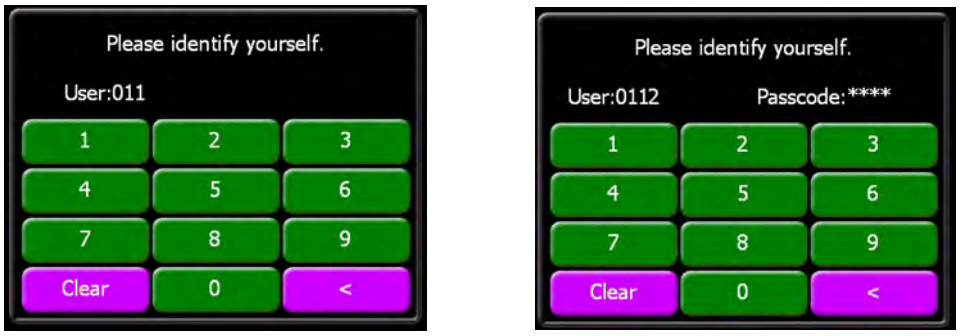
The same is the case on the authorisation window and all other windows where a user needs to enter their login details:
Stock Count Locations - Zonal ID PM736
Additionally, stock-taking staff can print / enter a separate count location so that only those items selected for the location show on the count sheets. This will be used by the system to set the order of the count sheets to follow the way the items are stored in each location, thereby speeding up the count process.
Head Office Configuration - Thread Setup
Open Aztec Stocks | Threads
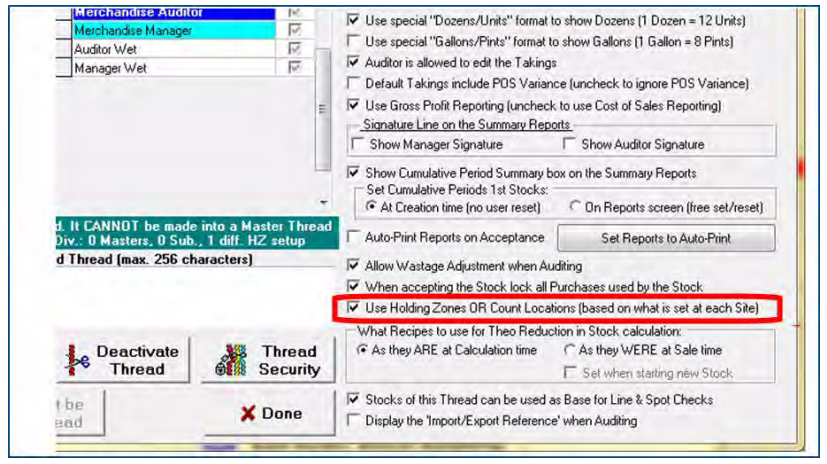
In the Threads Configuration screen, the check-box that previously controlled the usage of Holding Zones now also controls the usage of Count Locations, as a site can either have Locations or Holding Zones or none (but never both).
The Configuration screen (at site only) now requires the user to expressly turn Holding Zones on (after getting a valid setup). Turning off is also a user action but the system automatically turns off the usage if the setup becomes invalid (as in the old implementation). The same rules apply to location.
An important functional difference is that now you can set up both Holding Zones and Locations well in advance and only turn one ON when the need arises.
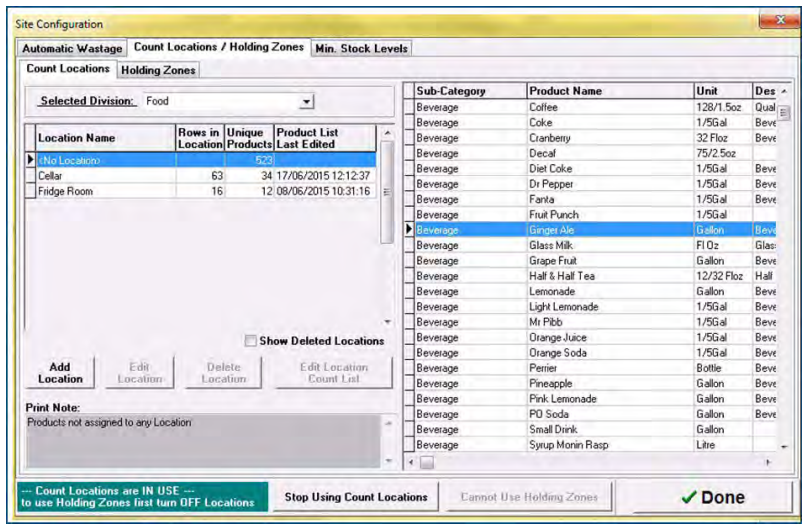
The tab called Count Locations / Holding Zones (with sub-tabs) is used for setting up both Holding Zones and Locations.
The rules governing the interaction of Holding Zones and Locations setup are:
-
You can configure a site’s Holding Zones/ Count Locations at any time
-
There are two new buttons on the Configuration screen (visible when you are on the right page)
-
If the site uses neither Locations nor Holding Zones then one button will be ‘Use Count Locations’ and the other will be ‘Use Holding Zones’. Only if the user clicks a button (and confirms when prompted) will the Locations or Holding Zones turn on and be used by the site
-
If the site uses Locations, there is a label stating this and the buttons will read ‘Stop Using Count Locations’ and ‘Cannot Use Holding Zones’ with the second button disabled. If the user then clicks ‘Stop Using Locations’ the site will no longer use Locations and the buttons will revert to the (a) state
-
If the site uses Holding Zones the button meanings will be reversed from that immediately above
-
All above bulleted points assume that Holding Zones are set up and valid and Locations are also set up (here the ‘valid’ state is simply to have one Location active, even if with no products, as we always have <No Location> as a fallback). If the Holding Zones are not valid, the button will state ‘Holding Zones INVALID’ and be disabled, and the same for Locations. Obviously if Holding Zones are invalid, you cannot turn on Holding Zones to be used by the site and the same goes for Locations.
If either Holding Zones or Locations are in use by the site and the user configures them as invalid (and saves) then the buttons will get the captions as above and the site will no longer use Holding Zones or Locations. This can be done by deleting the last Location, or by invalidating the Holding Zones setup, bearing in mind that Holding Zones become invalid if the head office adds a POS terminal and the site forgets to update the Holding Zones setup.
Setup of Locations
There will only be the ‘dummy’ location <No Location> to begin with. To create a Location click the Add Location button and in the dialog that appears, enter a Name and an optional Note (which will appear on the Count Sheet printout). The name must be unique for Locations.

Click Edit Location to change either the name or the printout note, using the same dialog shown above.
You can also delete a Location if it has no products allocated to it.
You can also see the Deleted Locations in the Locations grid by checking the check box beneath the grid.
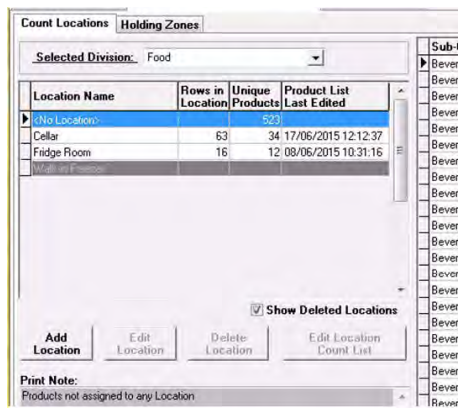
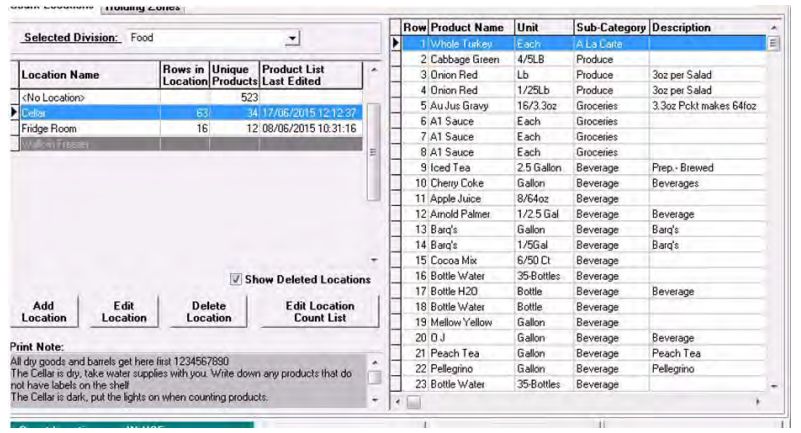
To the right of the Locations grid is the grid showing the List of Products allocated to that Location. or <No Location> the grid shows SubCategory, Product Name, Unit and Description and every product is included only once. It is ordered by Sub-Category and Product Name.
For true Locations the Product List is shown, having row as an extra field and ordered by that field. Here, products can appear more than once, with the same unit or with different units.
Note that in the image below, the column widths were shortened to allow all five fields to be displayed; by default the Description column is at the right and not immediately visible (user can either scroll, alter the widths or even change the relative position of columns).
Setting up the Location List
Click Edit Location Count List to allocate products to a Location.
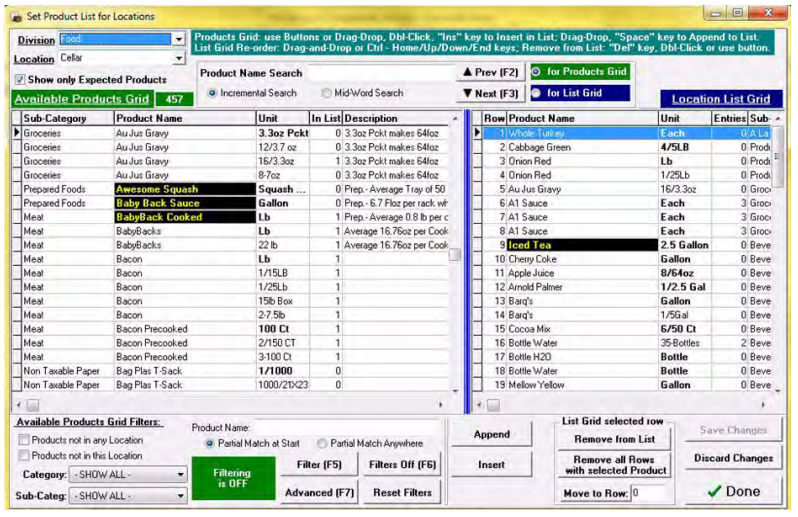
The basic function here is to select products from the left side grid, labelled Available Products Grid, and add / insert them in the right side grid, labelled the Location List Grid.
For basic product manipulation, users can use:
-
Buttons - Append and Insert to add to the list; Remove and Remove all Rows, to delete from the list
-
Keys - Ins and Space to add to the list, Del to remove
-
Mouse - double-click the Products Grid to add to the list; double-click the List Grid to remove; drag and drop both ways to add and remove; drag and drop to re-order the list
You can multi-select in the Products Grid and the buttons and keys will work with that but not the mouse methods.
The Product Name Search can be used for either grid by selecting the radio buttons to the right.
The Filters are only for the Products Grid.
Note that the Filters from both grids work in conjunction with each other, including with the ‘rapid’ check-box filter ‘Show Only Expected Products’ (located above the grid).
The main Filtering can be turned on and off (using buttons or keys) and there is also an ‘Advanced’ filter for experienced users. Note that turning the Filters off does not reset them - there is a separate button for that.
The List Grid has six columns (see below) which can be resized or moved relative to each other. The Prepared Items are highlighted (see row 9 in the example below). The Purchase Units (also known as Stock Units) are in bold.
The ‘Entries’ field shows how many times a Product / Unit combination is present in this list as most of time the lists are going to be long so only a small part will be visible at one time. It is always ordered by ‘Row’.
The Products Grid has the same highlighting as the List Grid.
The data can be re-ordered by clicking on any field title. The first click will use ascending order by that field and the title will turn yellow. The second click will use descending order by that field and the title will turn red.
The third click will go back to the default order (Category or Sub-Category depending on which is visible then Product Name then Unit with the Purchase Unit always at the top) and the title will turn back to the normal button colour.
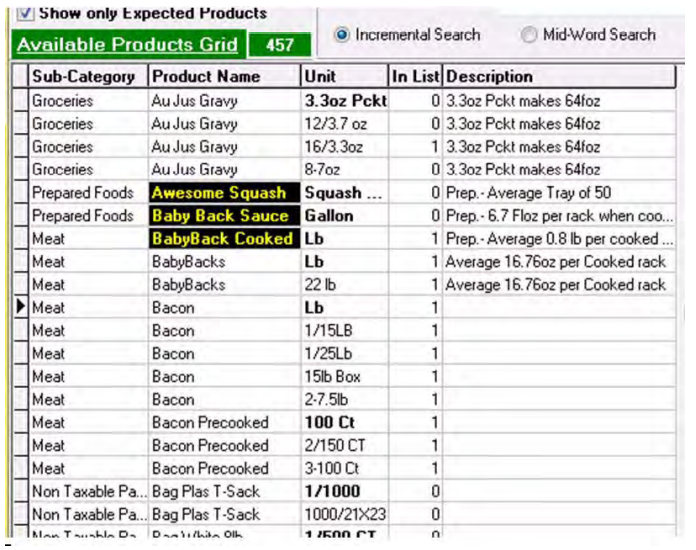
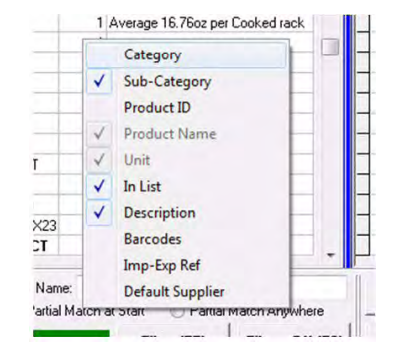
The Products Grid has five columns by default (see above), but the user can choose to display up to 10 columns and as few as two columns (with Product Name and Unit always visible).
You can change Division and Location without going back to the Configuration dialog.
When ready, click Save Changes. If you exit or change Division or Location (which effectively means a different list) you will be prompted to save if there are any changes detected.
Finally, the window will remember its size and position, the setting of the splitter between the grids as well as the selection of fields and their width for the Products Grid.
Using Count Locations to Audit
If the Site has Locations usage turned on and the Thread is set use them, then the Stock Audit will have new functionality in Aztec 3.7.2.
There will be no change in function or appearance in the Stock Calculation process either before or after the Audit Stage.
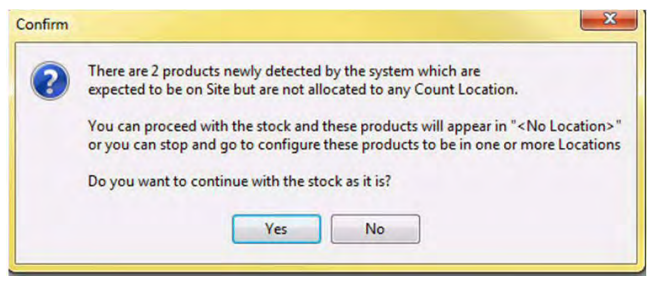
The first sign of Locations will come if the user has not allocated all the Products to the Locations list and the system detects ‘present’ items (such as with Stock Qty or Stock movement) in the <No Location> list. In such a case, a dialog is displayed prompting the user to stop and add products to the Location Lists.
The system then gets to the stage of printing the Count Sheets. The next part is in the Audit screen. There will be a complete site tab (read only) that has the summed up figures.
There will also be a <No Location> tab if there are any products left unallocated. The grids for these two tabs are exactly as the Audit screen.
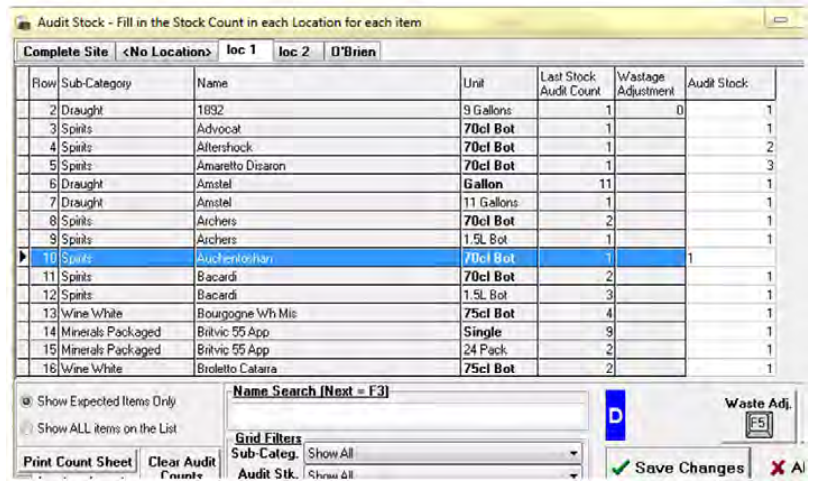
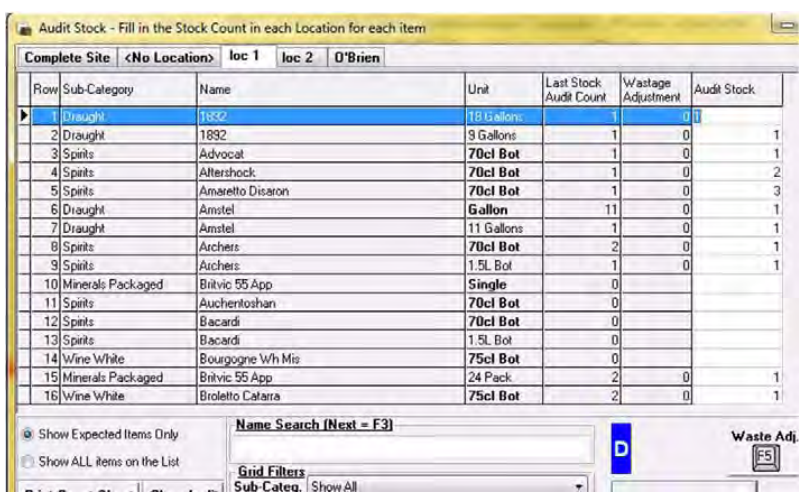
However, the Locations tab has many new changes.
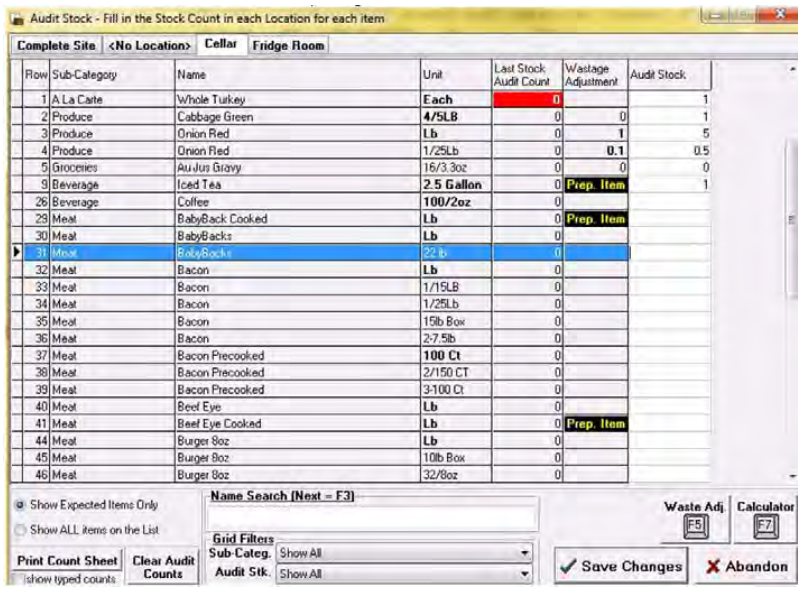
First of all, there are no columns with Purchase or Sales related information or information derived from them that is not relevant to Location Lists.
Now there is no ‘Wastage’ column but there is a ‘Wastage Adjustment’ column to show adjustment done by the user (using the button below the grid just as in the old Audit screen). If ‘Wastage Adjustment’ is turned off for the Thread, then this field is only used to show which Products are Prep Items.
The ‘Show ALL items…’ works just as before (including highlighting unexpected items counted by the user - refer to the top row in the example image above).
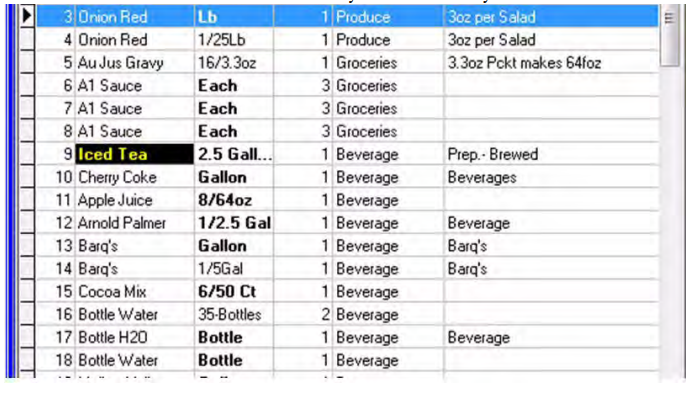
Count Sheet Overview
The <No Location> count sheet is just like a normal count sheet.
The real location count sheets are ordered by row (showing row number).
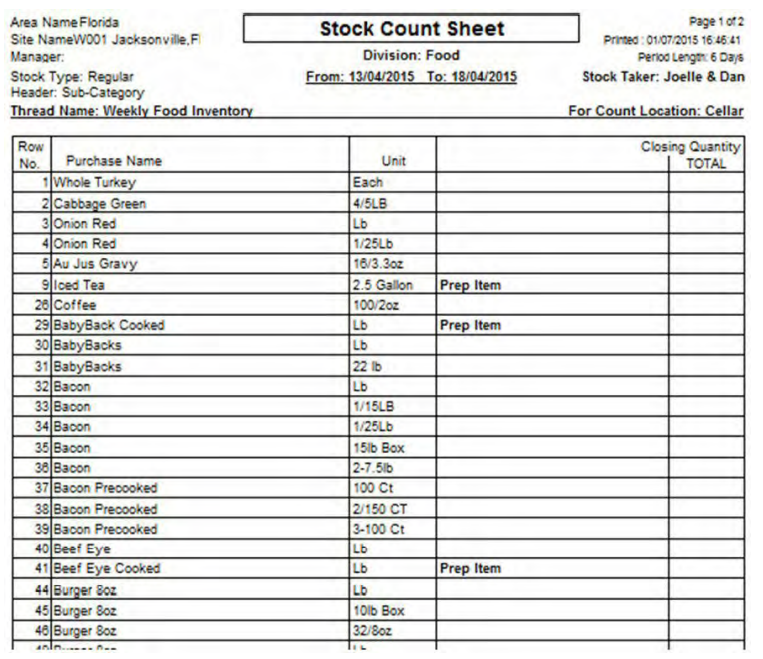
Note how the Row numbers jump from 5 to 9. The Count Sheet printed before entering the Audit screen will only show expected items. The Count Sheet printed from within the Audit screen will contain whatever the grid contains.
This means that by clicking the ‘Show ALL items…’ radio button and then ‘Print’ you will get the complete Product List, as configured.
Note that, as in the previous Audit form, if you only filter one Sub-Category (with or without ‘Show ALL items…’) you only get that printed
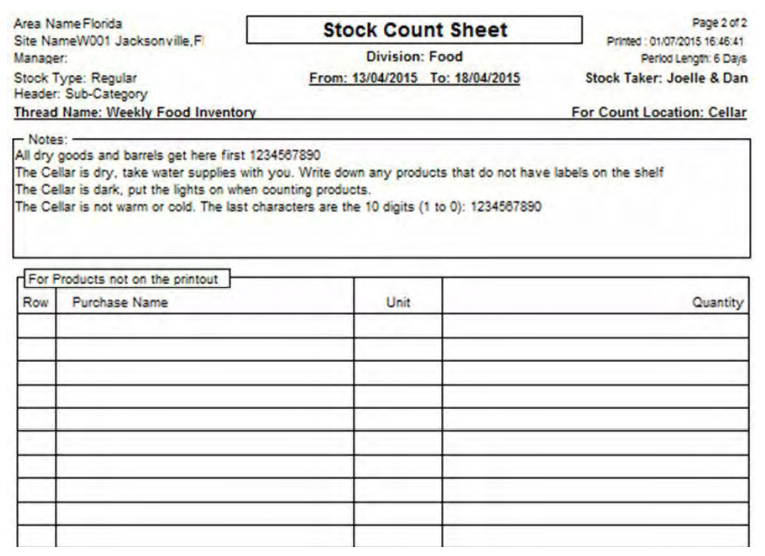
Each Count Sheet for a Location has a special last page. No matter how many records the previous page has, the last page will have the Location Print Note (if configured) at the top plus a bit of space for the user to write relevant notes.
Then, filling down to the end of the page, empty rows are added for the user to write things found in the Location that do not appear on the printout.
Even if there are no records to show, this special page will still print.
When all expected products have had their Counts entered for each Location (including <No Location> if any) then the Stock can proceed.
From here on everything is as normal; once the Stock Counts are saved to the main Stock tables, the Count Locations concept is no longer involved.
Examples of changes to location lists (including effect on old data)
The Location Lists are by definition set to use as their primary key, the row. Ideally these Lists will change rarely but changes are inevitable. Please read belowhow the changes in a Location List affect Counts entered in a Stock’s Location prior to the change.
The reason why some old entered data is lost when a Location List has changes is because a proper ‘match’ has to take into account the row number as well as the Product and the Unit.
The principle for all such matching is that if the saved Audit Count list has the same Row No, Product ID and Unit as the current list, then the saved Audit Count is adopted for the current list, otherwise it is not.
One obvious effect is that inserting a new item / unit row invalidates the matching on each and every row after the one just inserted. So does deleting a row. While a human can easily see that the whole list has just been dislocated by one row (down or up) the software has no way of knowing if the current ‘Row 15, Burger, Single’ is the same as the old ‘Row 16, Burger, Single’ only one row down.
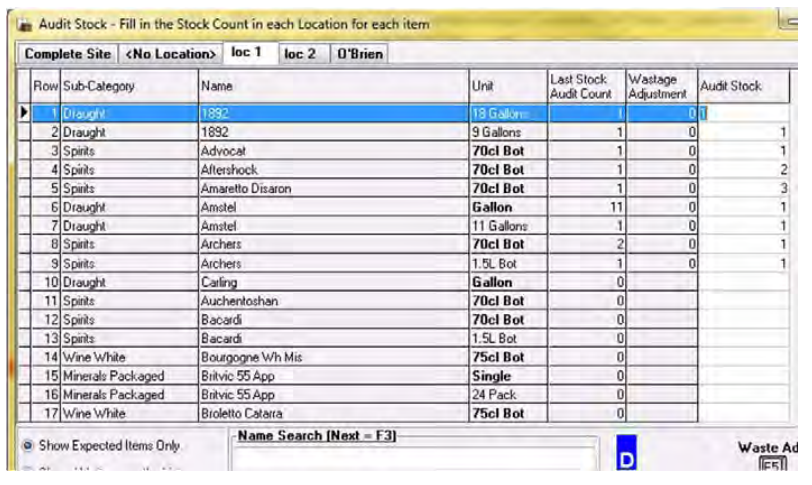
The first image shows the example initial situation where the user is in the middle of an Audit. All visible rows have Audit Stock quantity filled in. They all also show the Audit Count filled in the Last Stock column.
In the example image below, the Carling-Gallon combination has been added to the list in row 10 and all other items have been pushed down by one row.
The Stock was then re-calculated. The Audit Stock grid now shows the first nine rows with their previously entered and saved Audit Counts as well as their Last Stock Counts.
However, from row 10 downwards the previously entered and saved Audit Counts figures as well as Last Stock Counts have disappeared.
In the image below, the original list has been changed by moving what used to be ‘Row 14 - Britvic 55 App – Single’ (see first screenshot) to now occupy row 10.
That means rows 11 to 14 were ‘pushed down’ one Row to make space for the ‘Britvic 55 App – Single’ move.
These rows have all lost their previously entered Audit Counts as well as the Last Stock Counts.
However, from row 15 downwards the list is unchanged therefore the old figures are preserved.
One simple consequence of this mode of list matching is that simple addition of items at the bottom of the list preserves the rest of the list.
Items added manually at the bottom of the Count Sheet just need the user to add those items at the bottom of the List (in the Configuration screen) then Recalculate the Stock (‘Edit Audit’ button in the Current Stocks screen) and the new items will appear in the Audit Count grid (at the bottom) without losing any previously entered Counts.
Prevent Last POS Closing - Zonal ID PM737
Head Office Configuration - Theme Configuration
-
OpenAztec Theme Modelling | Site Setup | Miscellaneous tab
-
Select the Warn if Accounts Open check box to activate the open accounts warnings
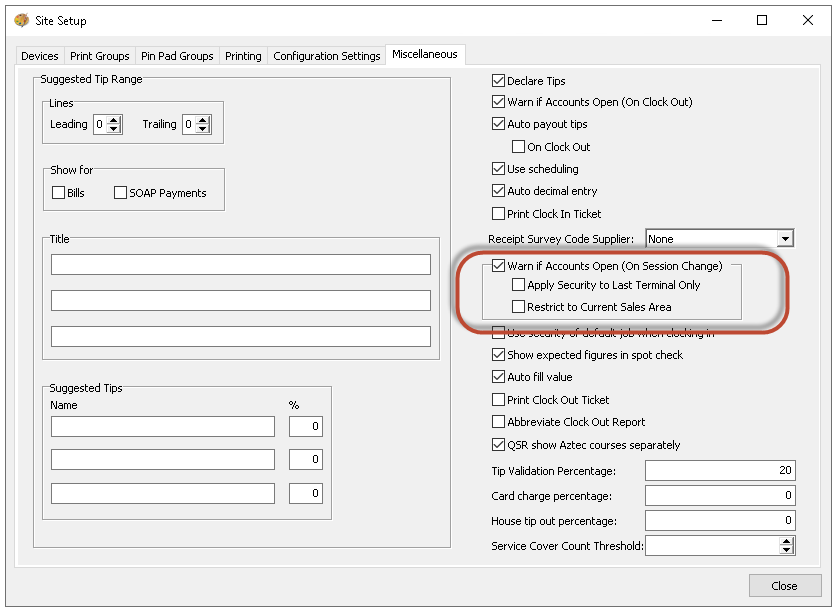
The two associated check-boxes described below become active
-
Select the Apply to Last Terminal Only check-box to apply security to the warning when attempting to close the last open terminal
-
Select the Restrict to Current Sales Area check-box to only display a warning when there are open accounts within the same sales area, rather than a check on all open accounts on site
-
-
Click Close to save your changes and return to the Theme Modelling main menu
A new button can be made available to allow users to close all mobile terminals from the POS rather than the back office.
Head Office Configuration - Add button to Theme
The Close Mobile Terminals button needs to be added to the relevant theme, this can be found in the button picker under Functions > Staff
For detailed information on adding buttons to theme panels root or local panels click here or for shared / variation panels here.
To add static panel security on the warning when you perform a session change:
-
OpenAztec Theme Modelling | Themes | Security
-
From the static panel security window select Confirm end drawer session with open mobile terminalsfrom the drop down list
-
Double click the button on which you want to add security
-
Select the roles you want to be authorised to use the button
-
Select the Witness Required check-box if you want another user to witness the action
-
Click OK and Close to save changes, and close Theme Modelling
Head Office Configuration - Send Changes to Sites
For the new settings made at Head Office to take effect at site, perform a communications job to the required sites.
For detailed information on running communications jobs click here.
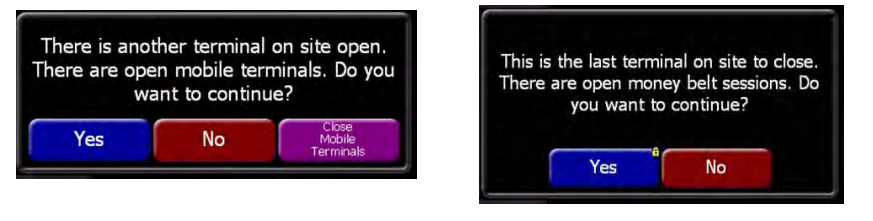
Front of House Operation
The following example screens display warnings for sales areas, but the same warnings will be displayed for sites when configured at head office.
Warnings are displayed according to their importance. The system makes checksin the following order and displays the highest priority warning message:
-
Unsaved accounts in the sales area
-
Saved accounts in the sales area
-
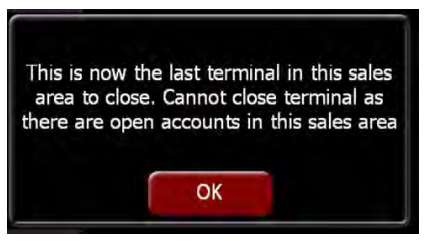
Open accounts on site
-
Open money belt sessions
-
Open mobile terminals
If you decide to ignore the warning and continue, no further warning reminders are displayed.
If there are unsaved accounts in the site or sales area:

If there are saved accounts in the site or sales area, you will be prompted to pick up the saved account.

Example Warning:
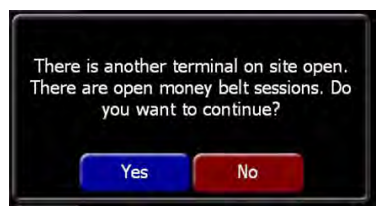
If a terminal is in the middle of a session change and a second terminal starts and completes a session change, the following message is displayed on the first terminal:
Security can be applied to the confirmation buttons so that only certain employees can authorise a session change. This can be set per comms server of by sales area. Security will only be enforced when a session change is attempted on the last open POS on the comms server / sales area.
Money Belt Auto End Session - Zonal ID PM761
The money belt auto end session is configured at head office on a per-site basis. The user can close the money belt session before the auto end time manually, but they cannot change the auto end time settings at site. At the configured time, all open money belt sessions will be closed automatically.
If a time is modified at head office after a site money belt session has started the original time will apply to that session.
Head Office Configuration
-
Open Aztec Base Data | Estate Structure | Estate Level | Site
-
Select the Finance tab | Declarations / Counts tab
-
Select the Auto Close Sessions check box, this will be deselected by default
-
Set the time at which you want to schedule the sessions to auto close
-
Select Save
A new report button must be added to the theme to allow money belt users to view their last auto closed money belt session.
Head Office Configuration - Add button to Theme
The Previous Money Belt Auto End Session report button needs to be added to the relevant theme, this can be found in the button picker under Functions > Reports
For detailed information on adding buttons to theme panels root or local panels click here or for shared / variation panels here.
Head Office Configuration - Send Changes to Sites
For the new settings made at Head Office to take effect at site, perform a communications job to the required sites.
For detailed information on running communications jobs click here.
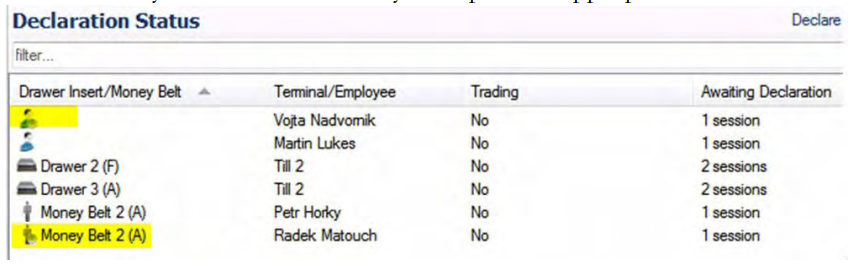
Site Operations
When auto closed money belt sessions are complete, they are displayed in the declarations screen (unless they have been configured to auto declare). They can be identified by the clock face overlay on top of the appropriate icon.
When money belt sessions are closed automatically, terminal report data is generated and saved, but no report is printed until it is requested on the back office.
If auto close sessions are enabled, the Aztec Things to Do list will display an entry informing the user that there are unprinted auto end session reports available.
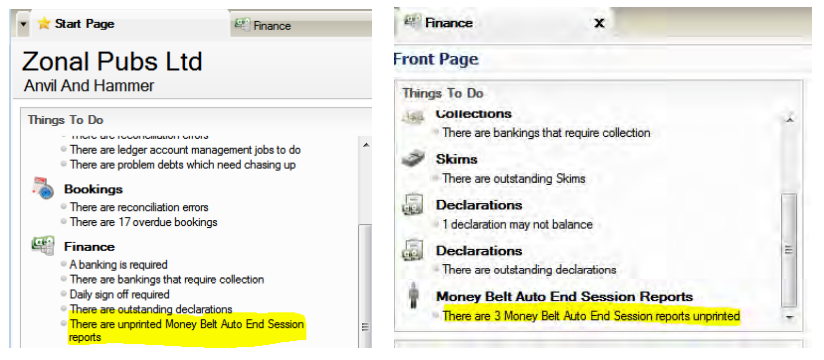
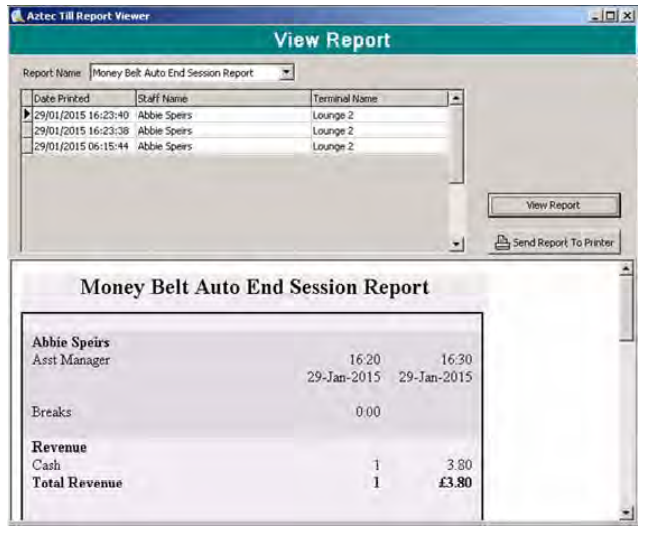
A new Money Belt Auto End Session report has been added to allow users to view information about all money belt sessions ended automatically.
This report can be accessed from the Aztec Terminal Report Viewer module on the Aztec Start page or by selecting the link on the Things To Do list. When a report has been viewed it will disappear from the Things To Do list.
Configure Prompt for Tip (Manual Card Payments) - Zonal ID PM769
Head Office Configuration - Payment Methods
If you still want over payments to be treated as a tip and part payments / correct amount to not prompt for a tip then all you need to do is deselect the Prompt when no overpayment check box (by default this is enabled).
-
Open Aztec Finance | Configuration | Payment Methods, choose the required payment method
-
From the Details tab select the Overpayment is Not Allowed radio button
-
To disable the tip prompt when the correct amount has been paid, ensure the Prompt when no overpayment check box is deselected
-
Select Save
Head Office Configuration - Send Changes to Sites
For the new settings made at Head Office to take effect at site, perform a communications job to the required sites.
For detailed information on running communications jobs click here.
Improve Setting of Print Stream - Zonal ID PM772
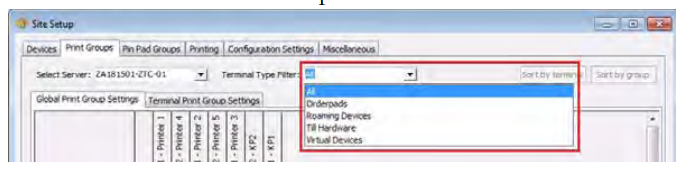
The global setting can also be filtered by hardware type, for example allowing print streams to be set for all iServe devices in one go rather than configuring each one separately.
Head Office Configuration - Print Streams
-
OpenAztec Theme Modelling | Site Setup | Print Groups tab
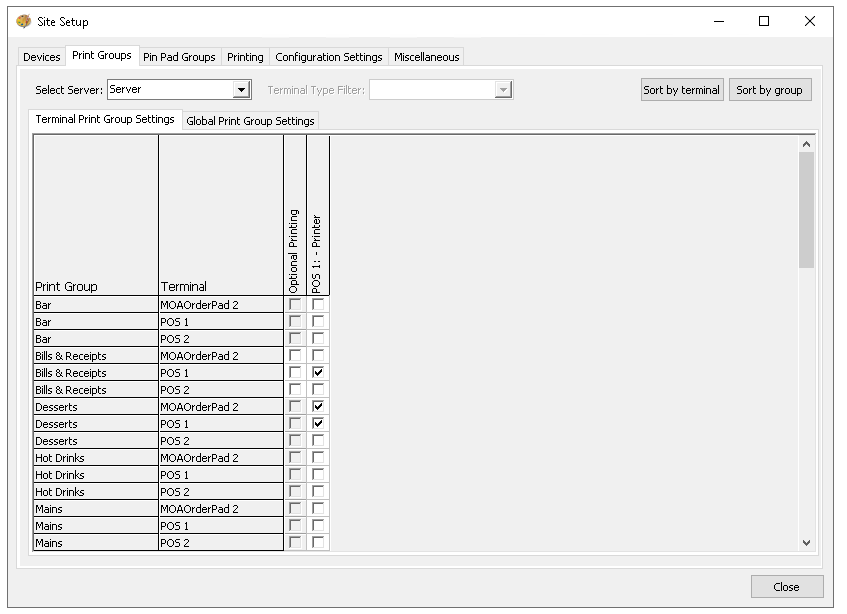
-
Choose the required devices from the Terminal Type Filter drop down list or choose 'all' to set the same print streams for all devices:
Selecting one of the available categories presents the user with a view of the print stream settings for the selected grouping of terminals. Modifying the print stream mapping affects all terminals in the chosen grouping.
-
Select the required printer, or select Optional Printing to allow the selected print group to use any printer on site
MOA devices are not affected by print group changes, so are displayed as read-only
After setting global print settings, individual POS terminals can have their print stream settings changed. On the global screen you will see a greyed out tick if not all terminals in the selection have the same setting
Loyalty Account Information on POS - Zonal ID PM780
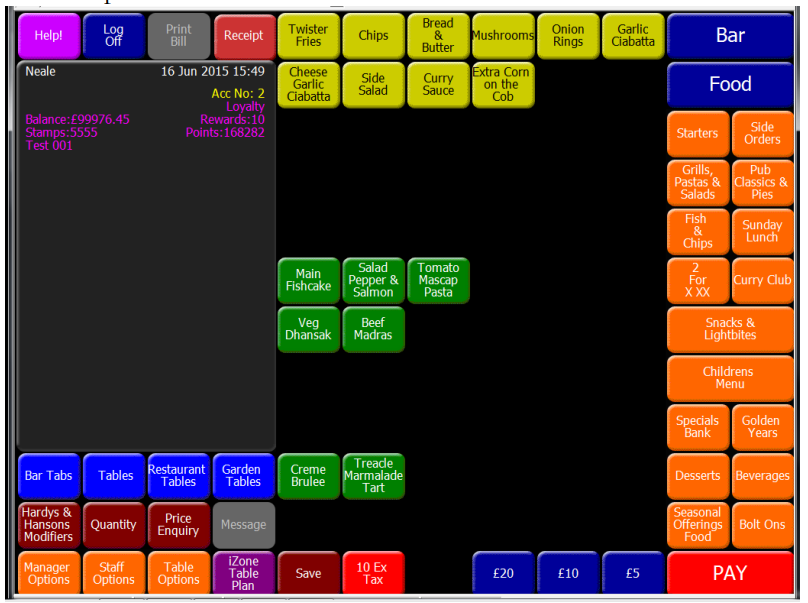
When a loyalty account is identified by the POS, the following information is displayed on the order display and the summary is refreshed when there is a transaction on the loyalty account:
-
Customer Name
-
Points Balance
-
Cash Balance
-
Stamps Balance
-
Prize Count
Zero balances for any of the above fields are not displayed.
This feature will only work with POS Integration 1.10 or later
Reprint Bill Security - Zonal ID PM798
Head Office Configuration - Front of House Role Permissions
The reprint bill permission must be added to the job role(s) that you want to be able to authorise a reprint or reprint a bill without authorisation.
-
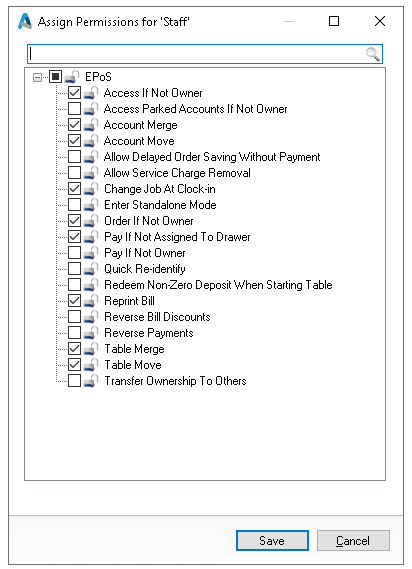
Open Aztec Staff & Security | Role Details
-
Select the front of house job role whose permissions you want to edit and select Assign Permissions
-
De-select or select the Reprint Bill to remove or apply the permission as required and select Save to record your changes
Head Office Configuration - Send Changes to Sites
For the new settings made at Head Office to take effect at site, perform a communications job to the required sites.
For detailed information on running communications jobs click here.
Front of House Operations
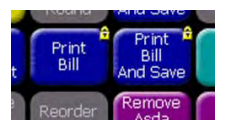
Once a receipt is printed, all print operations that would result in the printing of a duplicate bill are secured to users without the re-print bill permission. For example the Print Bill and Print Bill and Save buttons are padlocked as shown:
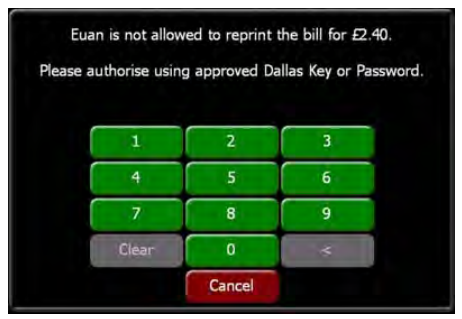
Any POS user without the re-print permission that attempts to reprint a bill will be prompted for authorisation:
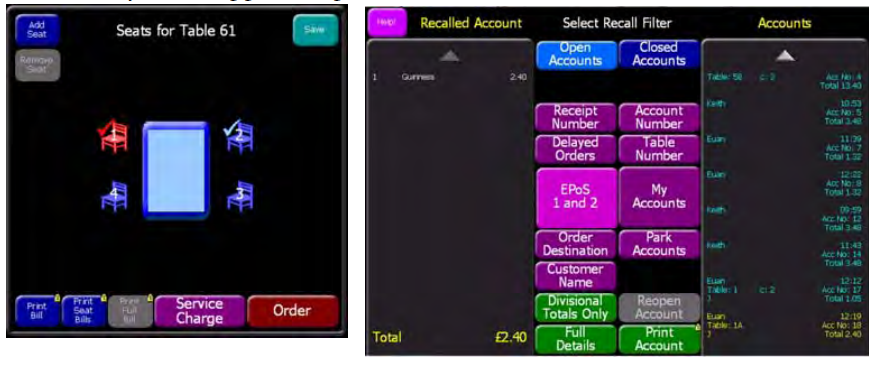
The security is also applied to per-seat tables and Recalled Accounts:
Per Seat Ordering & Bill Splits
If the re-print bill security is set up for sites using per-seat ordering, selecting print buttons can have different effects.
| Bill Single Seat | If a bill has been printed for a single seat, all print options that contain the single seat that has been printed will be locked |
| Print Bill or Print Bill and Save | If either of these buttons have been printed, only these buttons are locked |
| Print Seat Bills or Print full bill | Locks both of these and all individual seats |
| Visual split bill | This prints all bills and locks all print buttons |
| Buttons that initiate automatic printing | If a bill is printed automatically, for example when selecting ‘Split total by’, the print bill button is locked |
Exemptions:
-
Print Last Round
-
Print Last Round & Save
-
Print Last Payment
Enhance Bill Format - Zonal ID PM799
Head Office Configuration - Bill Footers
-
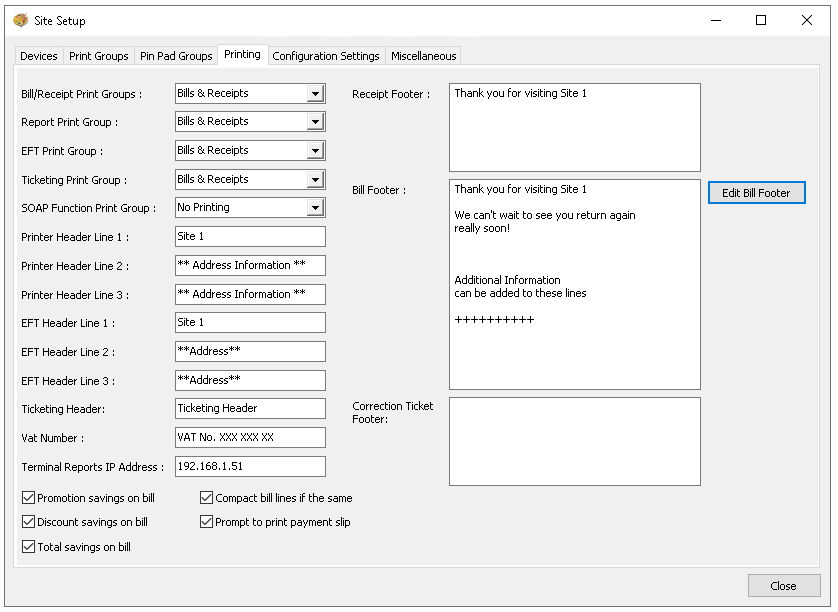
Open Aztec Theme Modelling | Site Setup | Printing tab
-
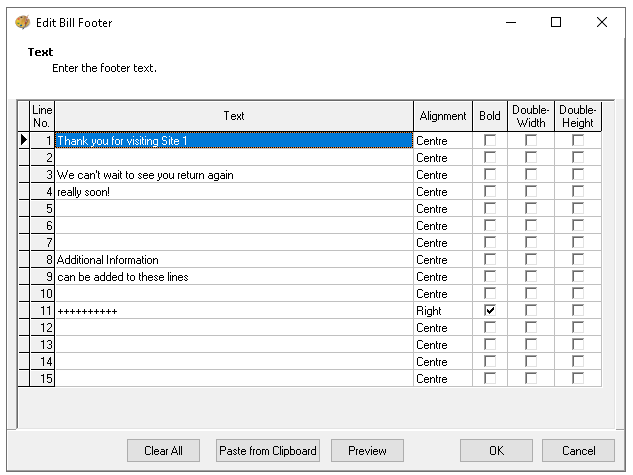
To edit the footer text, select Edit Bill Footer, you cannot edit the footer text on the Printing tab itself
-
Enter /edit the bill footer text as required or you can copy the required footer text from a different document and select paste to replace all the footer text with the contents of the clipboard
If the text on the clipboard has more than 40 characters per row, the text is wrapped into the next row.
If there are more than 15 rows after wrapping, the remaining text is truncated
-
Click in the alignment column to change the text alignment
-
Select the Bold, Double-width or Double-height check-boxes to modify the footer design as required
-
Select Preview to see how the footer will look when printed
-
Click Close and OK to return to the Printing tab
-
Click Close to return to the Theme Modelling main menu
Head Office Configuration - Send Changes to Sites
For the new settings made at Head Office to take effect at site, perform a communications job to the required sites.
For detailed information on running communications jobs click here.
Promotional Bill Footer Voucher Codes - Zonal ID PM800
This gives users greater control over where promotional footers are printed:
-
the same promotional footer to be printed on customer bills as on receipts
-
different promotional footer on bills and receipts
If a promotional footer is chosen to print on bills, the same footer will be printed on every print and reprint of the bill.
When multiple promotional footers are defined, the configuration settings and priorities assigned to each will determine what appears on the bill / receipt.
Head Office Configuration
When creating a new or editing an existing promotional footer, head office users can configure whether the footer will be printed with the receipt or the bill by selecting from the drop down list.
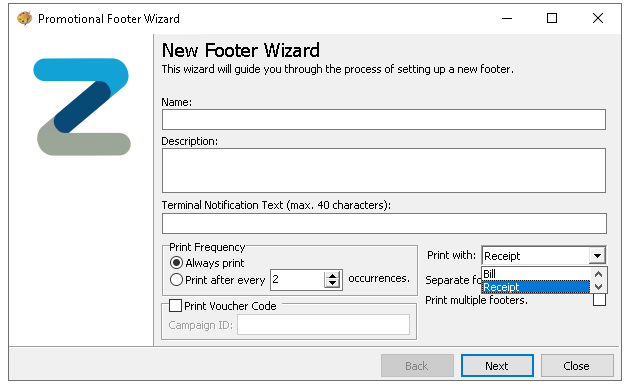
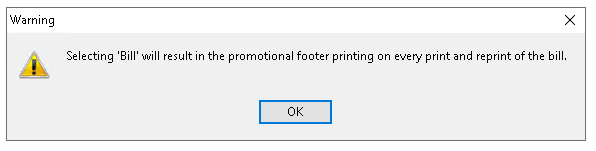
If bill is selected, a warning message is displayed to advise the user that the promotional footer will be displayed every time the bill is printed or reprinted.
If a voucher code needs to be generated to be included in the promotional footer, select the Print Voucher Code check-box and enter the required Campaign ID code.
A promotional footer can also display a survey code on the footer as well as the voucher code. For more information about appending a survey code see bill footer formatting.
Audit Transaction Report - Zonal ID PM812
The report will include the following information:
-
Table Moves
-
Account Merges
-
Service Charge Changes
-
Cover Account Changes
-
Account Name Changes
-
Bill Printing
Viewing The Report
-
Select Aztec Reports | Standard Reports | Transactions
-
Open the Audit Transaction Report, select the report parameters as required, click View Report
The Audit Transactions report for the selected date is displayed. Any fields that are not populated by data are hidden from view.
Alphanumeric Discount Code - Zonal ID PM816
If a discount is flagged to capture an alphanumeric reference, any configured ranges for the discount are disabled (they are retained in case the alphanumeric reference flag is removed) and the scanned QA or barcode is used as the alphanumeric reference to activate the discount. A separate prompt for alphanumeric reference will not appear.
The alphanumeric discount code is included in two reports, appearing in the Information column in the Audit Transaction report and in the Detail column in the Detailed Transaction report.
Head Office Configuration - Discounts
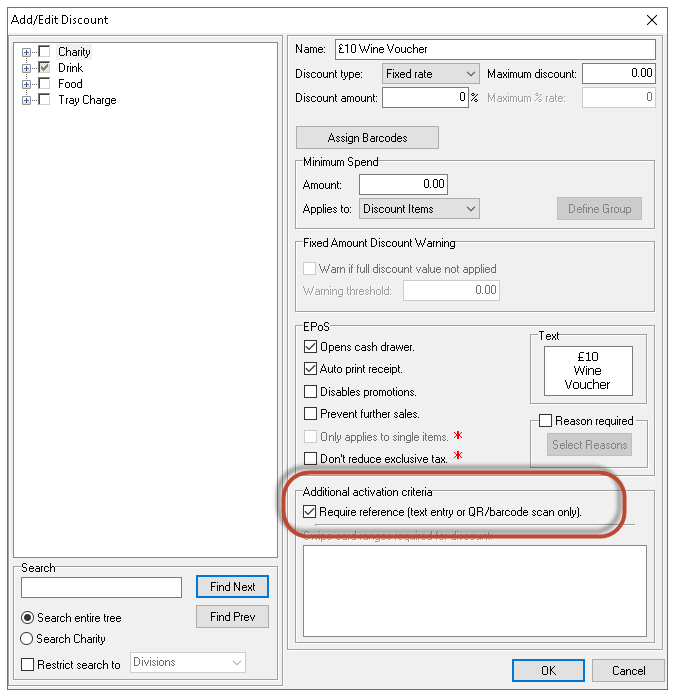
When creating or editing a discount, users can define whether POS users are prompted to enter an additional alphanumeric reference to activate the discount.
When an additional reference is required, the selected list of swipe card ranges is disabled. (The swipe card ranges are retained for future use in case the requirement for a reference is removed at a later date).
-
Open Theme Modelling | Estate Settings | Discounts tab
-
Select Add / Edit Discount
-
Select the Require reference text check box
-
Click OK to return to the Theme Modelling main menu
Head Office Configuration - Send Changes to Sites
For the new settings made at Head Office to take effect at site, perform a communications job to the required sites.
For detailed information on running communications jobs click here.
Front of House Operation
When a discount button is selected on the POS, the following alphanumeric keyboard is displayed.

The POS operator must type a string (no spaces allowed) or scan a barcode / QR code. (A string cannot be obtained by swiping a card in the Magnetic Strip Reader).
If a suitable reference is not captured, the system will not enable the discount.
Allow Reasons on Discounts - Zonal ID PM817
The Discount reason is included in two reports, appearing in the Detail column in the Audit Transaction report and in the Information column in the Detailed Transaction report.
Head Office Configuration - Reasons
When creating or editing a discount, users can define whether POS users are prompted to select or enter a discount reason before proceeding with the sale.
-
Open Theme Modelling | Estate Settings | Reasons tab
-
Select Add reason, enter the reason text
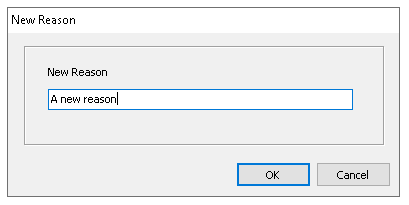
-
Select OK
-
Enter the button text as you want it to be displayed on the POS, click save
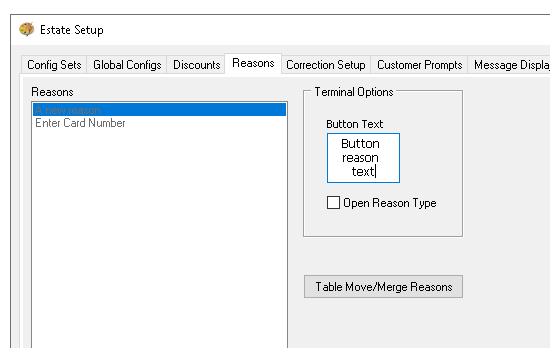
Select the Open Reason Type check box if you want to provide POS users with a free text field for entering a discount reason at the point of sale
-
Still on the Estate Setup window, select the Discounts tab page
-
Select Add / Edit discount
-
Select the Reason Required check box and select the Select Reasons button to assign reasons to the discount
The discounts window allows movement of reason between selected and available
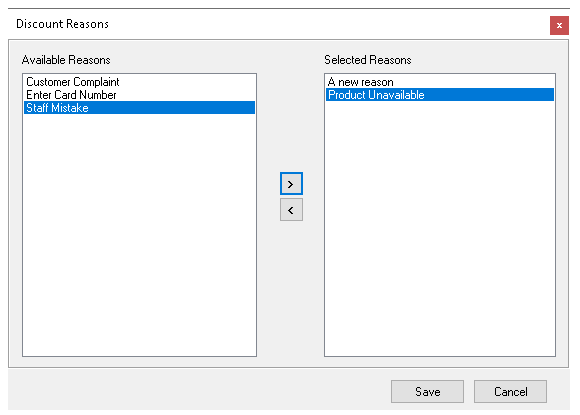
20 discount reasons per discount can be assigned
-
Click Save to return to the Add / Edit Discount window
Head Office Configuration - Send Changes to Sites
For the new settings made at Head Office to take effect at site, perform a communications job to the required sites.
For detailed information on running communications jobs click here.
Customer Information Prompts - Zonal ID PM818
When enabled, the customer information prompt allows a POS user to capture additional information about the customer against the EPoS account which can then be used for reporting. This prompt is activated and configured at head office.
Head office users can name the prompt as required for their business, for example renamed as ‘villa’, the prompt can be used to record a customer’s chalet number at holiday parks or it could be 'flight number' to capture boarding card details at airport sites.
The data must be entered manually unless you are scanning a flight capture barcode. The Motorola DS9208 (SYMBOL66-BARC-2D) supports the required barcode format for boarding card barcodes only. For example:

A boarding card barcode can be an Aztec barcode or a PDF formatted barcode depending on whether it is presented in printed or electronic format. Printed
barcodes are two-dimensional in PDF417 standard containing a structured data message (SDM). Electronic barcodes could be presented in Aztec, Datamatrix or
QR code formats containing a structured data message (SDM).
The customer information is recorded in the audit trail and sent back to Head Office as part of standard comms for reporting purposes.
Head Office Configuration - Prompts
Users can define customer information prompts in the new Customer Prompts tab page.
-
Open Theme Modelling | Estate Settings | Customer Prompts tab
-
Click Add to create a new prompt
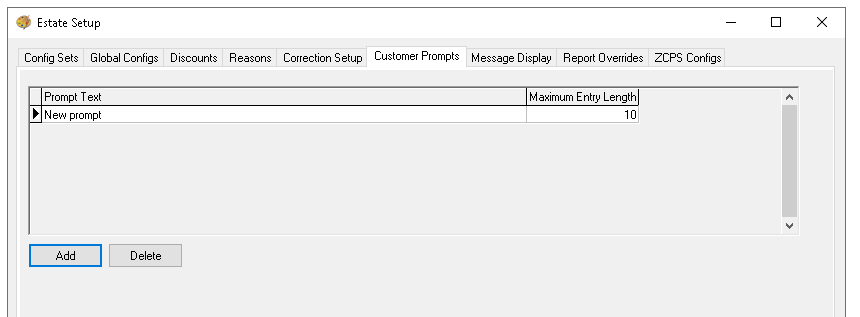
The prompt defaults to New Prompt with a length of 10 alphanumeric characters
If flight capture has previously been enabled for the estate, its prompt will be renamed use the text "Scan or Type Flight Number"
-
Click in the Prompt Text field and enter the name of the prompt
-
Click in the Maximum Entry Length field and enter the number of alphanumeric characters that you want to allow
-
Still within the Estate Setup window, select the Config Sets tab page
-
Scroll along to the Customer Information Prompt column, select the required prompt (or No Prompt) from the drop-down list
-
Click Close to save your changes and return to the Theme Modelling main menu
-
Still within Aztec Theme Modelling at Head Office, select Themes from the main menu, and within the Available Themes group box, with the appropriate estate theme selected, click Security. You can now set static panel security for the customer information prompt screen by double clicking the relevant button to edit security for that button. For example, if you want to ensure that a number must be entered, you can apply security for various roles on the customer information prompt screen’s Cancel button
Head Office Configuration - Send Changes to Sites
For the new settings made at Head Office to take effect at site, perform a communications job to the required sites.
For detailed information on running communications jobs click here.
Front of House Operations
The enter customer information prompt on the POS terminal allows operators to use a barcode scanner to:
-
Scan a boarding card barcode
-
Scan the boarding pass from a mobile phone screen
-
Manually enter the customer information prompt against an account - when the number is being entered manually you can enter up to 10 alphanumeric characters, including any symbols present on the terminal keyboard
If more than one reference is entered against a till account (manually entered or scanned) the latest one to be entered is recorded against the account.
Customer information can be added to the account at any time and the information will be audited and an account number assigned (if the account did not have one already).
If this is done before the first payment is made, then the payment will start without displaying the customer information prompt.
If this is not done before the first payment is done then the appropriate prompt is displayed, for example ‘Enter flight number’ in the image shown below.
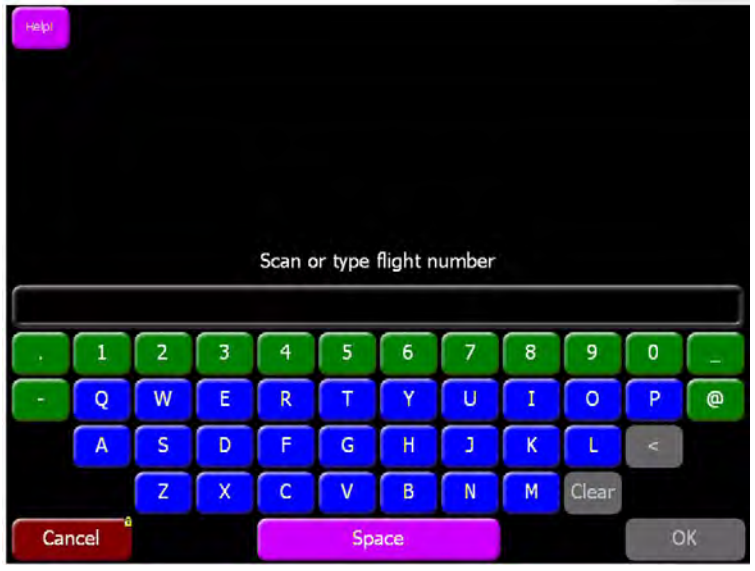
At this point the boarding pass can also be scanned. There is a padlock on the cancel button indicating that this user needs authorisation to cancel without entering a reference. If cancel is pressed, a null entry is audited and the are no further prompts for customer information prompt entry. The OK buttons are disabled until the minimum number of characters have been entered.
Once a boarding pass has been scanned, customer information entered manually or cancelled, the payment continues displaying other dialogs if required.
Only boarding pass barcodes can be scanned. If an unrecognised barcode (not originating from a boarding pass) is scanned whilst on this dialog the alert message “Barcode notrecognised as flight number” is displayed.

The customer information prompt dialog can also be started by pressing the appropriate button on the POS. If this entry is then cancelled, no reference is recorded.
If an account with a customer information number is merged or split the reference will be transferred.
Configure Virtual Terminals Separately - Zonal ID PM820
Head Office Configuration - Virtual Terminals
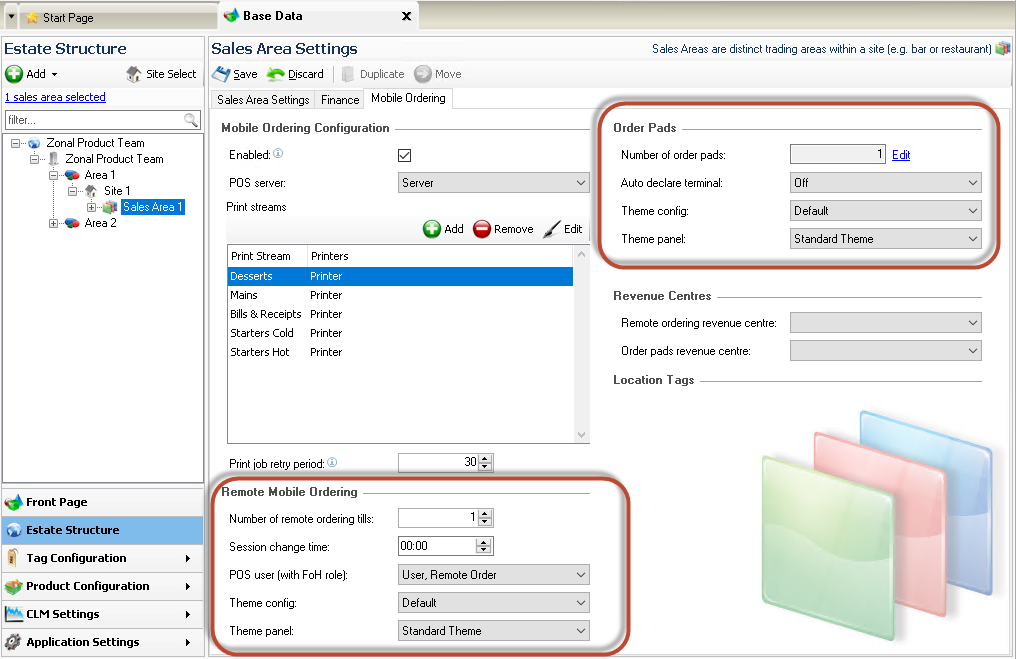
In Base Data users can now specify the Theme Config Set and Theme Panel design for all Mobile Ordering virtual terminals and all OrderPad virtual terminals:
-
Open Base Data | Estate Structure | Site | Sales Area | Mobile Ordering tab
-
Define the number remote ordering tills
Once this is set to a value > zero the Theme Config and Theme Panel fields are activated
-
Select the required theme config set defined for virtual terminals from the drop-down list
-
Select the required theme panel from the drop-down list
-
Select Save to keep your changes
The Panel Design drop-down in Theme Modelling has been changed to read only now that the ability to set the Theme Panel design for remote mobile ordering is carried out in Base Data
Head Office Configuration - Send Changes to Sites
For the new settings made at Head Office to take effect at site, perform a communications job to the required sites.
For detailed information on running communications jobs click here.
Alphanumeric Promotion Authorisation - Zonal ID PM823
This authorisation is not validated by the POS terminal, but is associated with the promotion redemption and audited to allow reporting.
When the Promo Card Swipe button is selected, the user will be prompted to enter an alphanumeric string via keyboard entry, swipe card or by a scanned QR code.
A promotion using the alphanumeric references will still attempt to match against configured card ranges and if a valid card is captured then it is used as the authorisation and the alpha reference not required. If the scan doesn't match the ranges or if no ranges are set up, the scan is classed as the alphanumeric reference.
Head Office Configuration - Promotion Setup
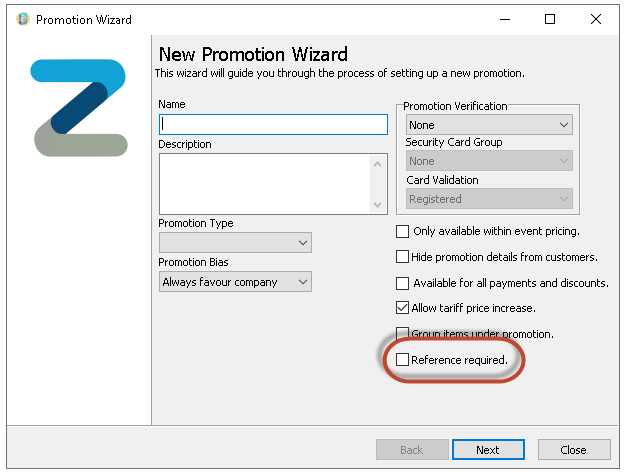
When defining a promotion, users must ensure that it is set to require the capture of a mandatory alphanumeric string.
A new Prompt for promotion code has been added to the New / Edit Promotion wizard. This can be used in conjunction with card activated promotions, but if it is, the authorisation code can only be typed if it is not in the card range, and the defined card range will take priority.
Head Office Configuration - Add button to Theme
The Promo Card Swipe button needs to be added to the relevant theme, this can be found in the button picker under Functions | Ordering
For detailed information on adding buttons to theme panels root or local panels click here or for shared / variation panels here.
Market Force Survey Codes - Zonal ID PM825
A unique, twelve digit reference is created, made up from the:
-
POS system time, day and month
-
Aztec site reference (padded to five digits using leading zeros)
-
POS account number (four digit account number)
The Market Force Survey codes feature in this release only supports Aztec site references of up to 5 digits. Any existing site reference greater than 5 digits will cause a Send to POS failure
Users of Market Force Survey codes must note that only sites on Aztec 3.7.0 (or higher) will contain the survey codes within their promotional footers. Sites on lower Aztec versions will not have this information included.
Head Office Configuration - Enabling Survey Codes
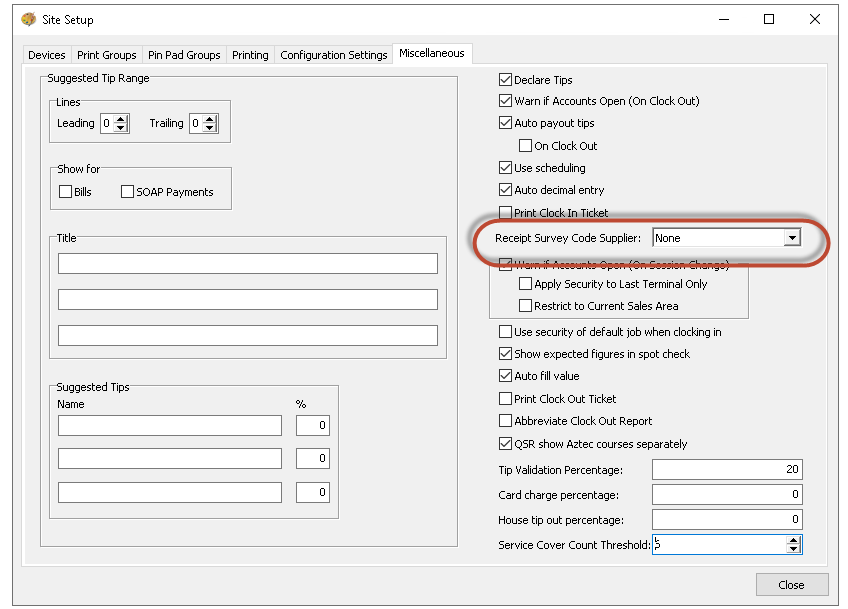
Head office users can configure which receipt survey code provider will be used for each site.
-
Open Aztec Theme Modelling | Site Setup | Miscellaneous tab
-
Select Market Force from the drop down list
-
Select Close to save your changes and return to Theme Modelling main menu
Head Office Configuration - Promotional Footers
The Footer text step in the Promotional Footer Wizard now allows users to append the survey code to the footer by selecting the Append Survey Code check box if receipt surveys have been enabled in Aztec Theme Modelling:
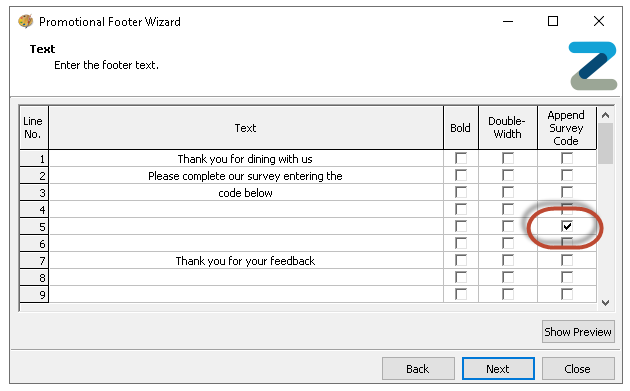
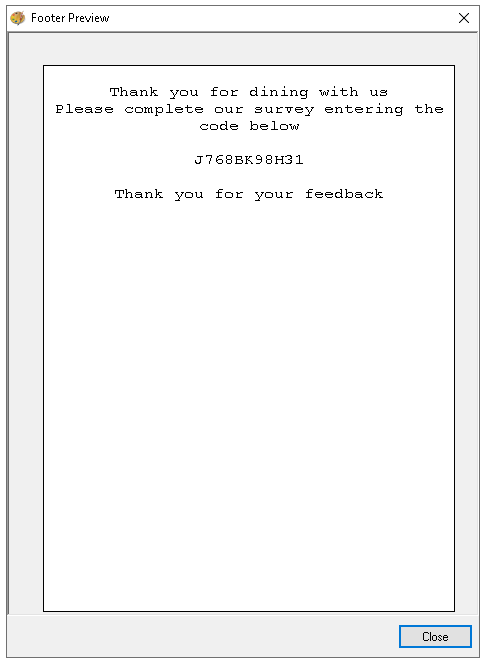
The same Append Survey Code column has been updated in the Promo Footer Override at site.
Record Receipt Prints - Zonal ID PM827
This section describes a further enhancement to the report that makes fraud prevention analysis more effective by recording the printing and reprinting of receipts. The audit trail records each time a POS (not EFT) receipt is printed and re-printed for the following:
-
Payment
-
Print Last Payment
-
Print Recalled Account
The new recording process is triggered by the attempt to print, not by whether the print request succeeded or not. No recording is carried out on receipts generated when an EFT transaction is declined; a customer receipt was previously, and continues to be, produced confirming the declined transaction
For each receipt print entry, the following new information is recorded in the Audit Transaction Report:
-
Terminal ID that the receipt was printed from (including iServe or ZCPS advanced roaming VTs
-
Employee logged on to the terminal
-
Employee authorising the receipt print action
-
Employee witnessing the receipt print action
-
Aztec Account ID
-
Date/Time of the print action
-
Payment ID (not included for printed Recalled Open or Closed Accounts)
The following error messages are displayed for a range of 'Print Last Payment' failed requests:
-
Cannot print payment as account no longer exists
-
Cannot print payment as account is in use by <employee name>
-
Cannot print payment as it is on hold
-
Cannot print payment as account no longer exists
-
Cannot print payment as it was corrected by <employee name>
-
Cannot print payment as it was a debit
-
Cannot print payment as it was declined
The above conditions are now detected on the EPoS server in addition to ensuring accurate detection of duplicate print requests.
When payments are corrected, refund receipts are printed with the receipt numbers of the original payment.
If a MOA terminal ‘print last payment if account exists’ is called, the terminal audits the print accordingly.
If accounts are open during an upgrade the system will lose any saved information relating to whether the receipts have previously been printed i.e. they will not have the ‘DUPLICATE’ line if they are printed again from recall or print last payment
IP Printing Support - Zonal ID PM855
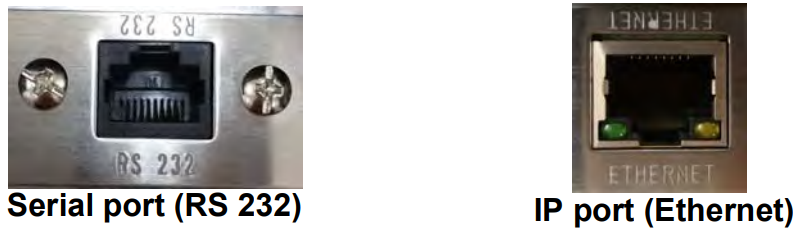
Support has been added for the BTP-R580II IP thermal printer that can be connected to the site network via an ethernet hub. This printer supports the printing of graphical logos.
Support has been added for the BTP-M300 IP impact printer that can be connected to the site network via an ethernet hub.
There is very little visual difference between the existing serial versions of both printers, and the newly introduced IP version. To aid identification, the following images show a close-up of both a serial port (RS 232) and an IP port (Ethernet) - that has green and yellow LEDs.
Head Office Configuration - Printer Setup
-
Open Theme Modelling | Site Setup | Devices tab
-
Right click the POS or server to which the printer will be associated and select Add Device
-
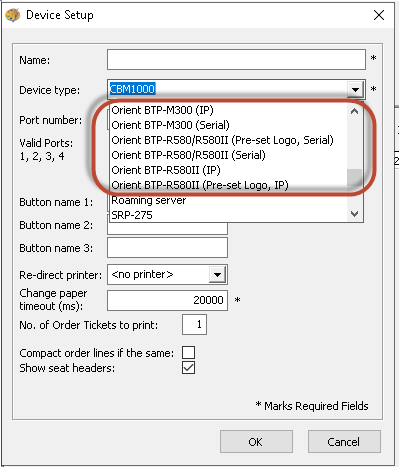
Select one of the new device types from the drop down list
The system detects an IP printer has been selected and displays the IP Address and Port fields
-
Enter the IP Address of the printer that needs to be unique on the site network and enter the default IP Port number of 9100
-
Click OK and select Close to return to the Aztec Theme Modelling main menu
Head Office Configuration - Send Changes to Sites
For the new settings made at Head Office to take effect at site, perform a communications job to the required sites.
For detailed information on running communications jobs click here.
Price Embedded Barcodes on Receipts - Zonal ID PM856
This allows Aztec to be used primarily as a central order only terminal, printing to a receipt printer and kitchen printer. The printed receipt, bearing the associated barcode, can be scanned on a third-party retail terminal for processing payments.
Head Office Configuration - Enable Barcodes to Print
-
Open Aztec Theme Modelling | Estate Setup | Config Sets tab
-
Scroll along the Terminal Configuration Sets grid to the Price Embedded Barcode check boxes
-
Select the Price Embedded Barcode check box alongside the terminal that you want to configure to be the order terminal
-
Select Close to save your changes and return to the Theme Modelling main menu
Head Office Configuration - Send Changes to Sites
For the new settings made at Head Office to take effect at site, perform a communications job to the required sites.
For detailed information on running communications jobs click here.
POS Operations
When operating in this mode, the Aztec POS follows normal POS behaviour. Reversals, voids and other actions on the closed account are all carried out as
normal and an updated receipt produced on account (re)close.
Reprints do not generate a barcode, receipts of this type being marked as duplicate. Only when the account changes value is a new barcode generated and printed.
ATM Terminology - Zonal ID ZBS028
Reports now use the terminology that users see when completing ATM activities in Finance.
ATM Report
Terminology in the ATM report has changed:
| Old Report Terminology | New Report Terminology |
|---|---|
| Declared | ATM Dispense |
| Remaining Cash | ATM Remaining Cash |
7 Day Statement of Trade
Terminology in the 7 Day Statement of Trade report has changed:
| Old Report Terminology | New Report Terminology |
|---|---|
| ATM Refill | ATM Deployed |
| ATM Declaration | ATM Cash Remaining |
Future Cost Prices - Zonal ID Unknown
For a defined future cost where a product has multiple supplier lines, each supplier line will now show the cost as it will be on that future date, even if there have been interim future cost prices set.
Within the Aztec Product Modelling system, when a future purchase cost change is made, only rows for the changed purchase units are added to the PurchaseUnitsFuture table. Previously, rows for all the product's purchase units were added to that table, even those whose cost had not been changed.
Example of new behaviour:
Today:
-
Supplier / pack size 1 = £1
-
Supplier / pack size 2 = £1
Future cost on the 14th:
-
Supplier / pack size 2 is changed to £1.50
-
The other is not changed
In Aztec Product Modelling you now see:
-
Supplier / pack size 1 = £1
-
Supplier / pack size 2 = £1.50
Future cost on the 19th:
-
Supplier / pack size 1 is changed to £1.75
-
The other is not changed
In Aztec Product Modelling you now see:
-
Supplier/pack size 1 = £1.75
-
Supplier/pack size 2 = £1.50
Using the above example, previously the changes on the 19th would only have showed the change that was happening on the 19th and the other supplier line(s) displayed the current price (which could have been confusing if there were scheduled future cost price changes between today and the last scheduled future cost price).
Z300 Series Zonal POS Terminals no Longer Supported
Zonal’s Z300 series POS terminals are no longer supported and will not operate with this version of Aztec.
If an estate has any sites that use Z300 series POS terminals, the Aztec upgrade for these sites should recognise that and fail. If for any reason the upgrade completes (for example, if the installer cannot contact the terminal or if the terminal is set up as the wrong hardware type in Aztec Theme Modelling), the Z300 series POS terminals will be rendered unusable. Zonal recommend that you verify that there are no Z300 series POS terminals at site prior to upgrading to / installing Aztec 3.7.2
ZCPS Foreground Processing
In previous versions of Aztec (3.6 and below), ZCPS background processing was enforced that meant:
-
a ZCPS transaction needed to be started and finished on the same terminal
-
the user's account was locked until payment was completed
-
the till could not be used until the ZCPS transaction completed
From Aztec 3.7, EFT mode has reintroduced foreground processing meaning that:
-
multiple ZCPS transactions can be started (by different users) on the same POS terminal. The terminal no longer locks out while the ZCPS transaction is in progress and only the last screen in the transaction (which confirms the payment) locks the till to other users
-
'round-follow-me' works as before so that a ZCPS payment can be started on one till and completed on another. EPoS user permissions are still respected relating to whether a user is allowed to use a till and if the drawer opens for EFT payments, the user must have permission for that drawer. Similarly, if cashback is requested on the transaction, there must also be a drawer on the terminal
Local Printing for Standard Roaming PED Prints - Zonal ID PM814
Enhancements introduced by PM814 have been made to allow sites that use ZCPS 1.0.8 to configure which printer should be used while the PED is operating in Standard Roaming mode.
If the ‘Use POS Printing for Standard Roaming EFT’ check box is selected for a POS terminal (in config sets), any transactions initiated on the POS will print on the POS printer rather than the PED’s integrated printer.
WiFi Roaming Server - Zonal ID PM840
The previously specific 'ICC Verifone roaming server (Vx670 WiFi)' device type has been renamed ‘Roaming Server’ to reflect the fact that it can be used to configure a number of appropriate devices.
A new device type has been added, named ‘Point IP PED’, that can be used to support the Point plug-in and EMV payments (US systems only).
Stock System Enhancements
The functional rules for the Stock system to decide what to import are:
-
If the Stock is By Location then the system looks for valid Mobile Stock sessions only
-
If the Stock is By Holding Zone the system looks for valid Handheld sessions only
-
If the Stock is neither by Location nor by Holding Zone the system first looks for Mobile Stock sessions, and, if none are found, it then looks for Handheld sessions
If the system detects valid Mobile Stock sessions it displays a Mobile Stock Counts dialog with those sessions. Unlike the old Handheld Counts dialog this one does not automatically close once the user has completed the Import. It has a ‘Done’ button that can be used if the user does not want to carry out an import or when the user has completed the desired Import operations.
The dialog’s grid looks different depending on the current Stock’s usage of Locations. If the current Stock is By Location the grid presents each Session on as many records as there are Locations (which have Counts to Import).
Brand Logo on PED Waiting Screen
Please note that on Vx680 PEDs, the logo is only displayed briefly as a splash screen before the ‘Enter Transaction ID’ screen is displayed
All images for upload must be in .BMP format, saved with 8-bit colour (256 colours).
Head Office Configuration
To configure your system to display logos on the PEDs waiting screen:
-
Open Aztec Theme Modelling | Estate Setup | Global Configs tab
-
Using the Terminal Graphics upload function, upload the necessary graphics / logos
-
Remaining in Estate Setup select the ZCPS Configs tab, ATS VX680 Logo or ATS VX820 Logo depending on the PED models in use on your estate
-
Within the appropriate column (VX680 or VX820), select the brand image from the list of available images
You can apply a brand image to each of the individual sites on your estate or apply the same setting to all sites, using the `All’ config on the top line